Webexpenses’ Credit Card Reconciliation feature is a powerful tool made specifically for Accounts Teams.
Our in-house team conceived and developed this feature based on our customer feedback. Webexpenses users expressed how they wanted to automate the entire reconciliation process to speed up month-end processes and improve spend visibility.
Once we understood users’ pain points, the credit card reconciliation feature was created. What we built is a grid view of all company credit card claims to allow easy reconciliation of your credit card statements. These are automatically fed through to the system based on your active billing periods, allowing your Account teams to view within one place in the system.
The feature has several filters to manage claims collectively or individually, a check functionality to stay on top of claim statuses, and a nudge icon to notify claimants or approvers to review a claim.
Now, the reconciliation process for Accounts Teams is easier. It is more efficient, accurate, and accessible through this feature upgrade. It allows Accounts Teams to manage all credit card transactions including approved, pending, and submitted items.
The Credit Card Reconciliation setup allows an Accounts Team to:
- Save significant time processing claims
- Speed up month-end processes
- Gain full visibility on claim status levels
- Directly chase outstanding claims
Tip: Current users should contact their Webexpenses Account Manager prior to turning on this feature. It is available at no additional cost. However, your account manager will help you perform a system check to ensure the feature works correctly. Once your system is ready, admins can turn the feature on by navigating to Administration > Company Profile > Credit Card > Press the Credit Card Reconciliation button.
Navigating to the Credit Card Reconciliation screen
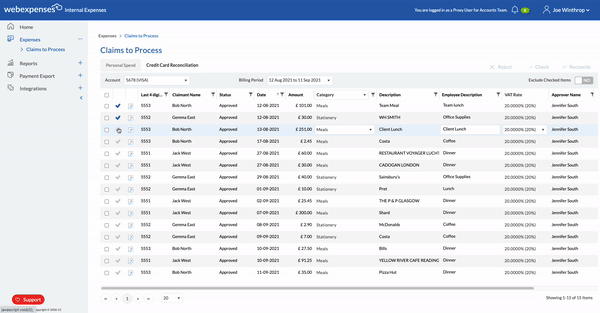
Once this feature has been activated, you can get there by following this path: Click on Expenses > Claims to process > CCR > Choose selected account > Select your billing period.
Working your way around the feature
Once you have clicked through to the reconciliation display feature, a grid of your selected account and billing period will appear. The grid will display all transactions within one screen: approved, pending, and submitted. There is also the ability to view split claims, the total number of attendees per claim, and travel information.
There are several filters across the top which will help you to manage claims effectively. They include:
- Last 4 digits of the card number
- Claimant name
- Claim status
- Date of purchase
- Purchase amount
- Purchase category
- Description
- Employee description
- VAT rate
- Approver name
- Claim number
This feature provides the ability to easily spot incorrect data. Accounts teams can amend fields, including category, employee description, and VAT rate. This will speed up the reconciliation process; saving time between the claimant and approver.
Note: The Accounts Team can only amend claim descriptions at an approved status. This is to ensure the claim has been authorised by the approver before being checked by the Accounts Team.
Nudge notifications
![]() On the left-hand side of the grid, you will see the nudge icon (left).
On the left-hand side of the grid, you will see the nudge icon (left).
Click this icon to nudge claimants and approvers with a notification:
- Nudge a claimant with a Pending status, to notify them to submit an unsubmitted claim.
- Nudge an approver with a Submitted status, which is waiting for approval.
Note: The notifications will be grouped together per user to avoid overwhelming users with multiple notifications. The icon will be disabled after the notification has been sent.
Check functionality
Another new feature in this release is the Check functionality. This feature displays a clear view of what claims are ready to be sent off for reconciliation. The Accounts Team can select approved claims one by one or select bulk ‘check’ to flag all approved transactions ready for reconciliation.
With this feature, accounts teams can keep track of approved claims on a regular basis to stay abreast of approval statuses.
Tip: Click on the Exclude checked items button (top right) to view your pending and submitted claims only.
Rejecting claims
Within the Credit Card Reconciliation grid, you have the option to reject approved transactions. Either select an individual claim or use bulk select to choose all claims and click on the reject button (top right). After you press the reject button, you can leave a comment to notify the claimant of the reason or how to correct the claim.
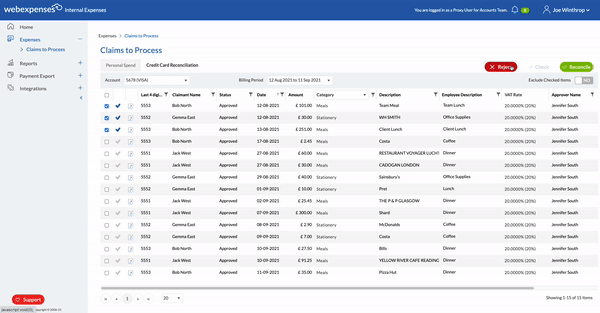
Tip: To make the process quicker, it’s possible to send the same rejection note to multiple claimants with different claims. However, if different rejection reasons are required, each line will need to be rejected separately.
What happens once I’ve reconciled my claims?
Once you have fully checked, selected, and ticked all items for reconciliation, you can go ahead and press the ‘reconcile’ button (top left). Afterward, the status will change to a Paid status. If you want to revisit the reconciled items, you can navigate to your credit card transaction report.
If you’d like to explore or access this feature, please email your Webexpenses Account Manager or fill out the form below: